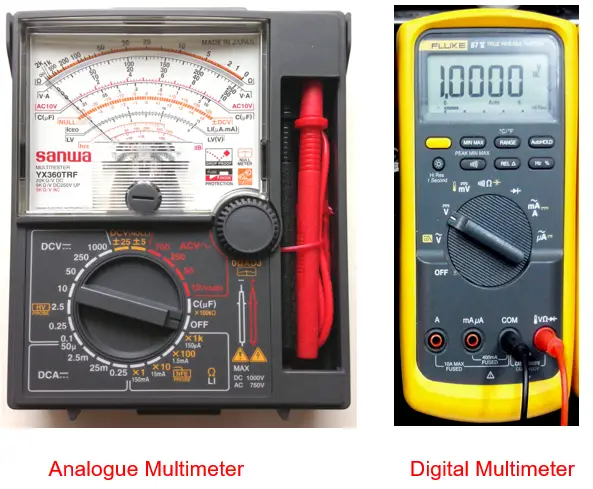
This article describes the procedure of current measurement with a multimeter. A multimeter is a device used in electrical and electronic circuits to measure a range of parameters like voltage, current, resistance, and sometimes, in addition to some other parameters like capacitance and frequency.
It is a versatile and an essential equipment for a circuit designer. Due to its ability to measure multiple parameters, it is termed a multimeter. A multimeter is available in both analog and digital variants. Here, we are going to understand all about measuring current using a multimeter.
The electric current in a circuit is the rate of flow of electric charge or the electrons with respect to the time when the circuit is connected to a power source. Various components can work under a tolerable range of voltage and current in a circuit.
Thus, the measurement of current is important to protect the system from thermal runaway (failure due to heat because of excessive flow of current) and also to set correct parameters to make the circuit operable. A multimeter helps in this.
The types of currents that can be measured using a multimeter are:
Direct current(DC): The electric current in which the flow of the electric charge is unidirectional with respect to time is called direct current. The average value of the current is positive and flows from the source to the load. Example: Current flowing to a battery-powered circuit.
Alternating current(AC): The alternating current is the one in which the flow of electric charge changes direction periodically. Household appliances and most industrial machines operate on AC current.
Before taking the measurement, one should set the multimeter mode to AC or DC as required in addition to the appropriate range. This is important for accurate reading as well as the safety of the multimeter.
Current Measurement Ranges
The current range in a multimeter is the maximum current up to which the multimeter can accurately and safely measure the circuit current. Different values of internal resistance are there for different ranges of current; hence, setting the multimeter to the correct range per the circuit is important.
The multimeter is powered by a battery and virtually takes no power from the circuit under test. It has a high input impedance that ensures that it doesn’t alter the circuit parameters.
Normally, the ranges are,
| Types of current | Digital Multimeter | Analogue Multimeter |
| DC | 200µA, 2000µA, 20mA, 200mA, 10A*. (*The 10A range is usually unfused and connected via a special socket.) | 50µA, 2.5mA, 25mA, 250mA. (A high current range is often missing from this type of meter). |
| AC | 15 A, 2 mA, 20 mA, 200 mA | 10mA, 50mA, 250mA, 500 mA |
It should be noted that the given ranges of current and voltage might vary depending on the specific model and manufacturer of the multimeter. Some multimeters are able to measure only DC parameters and not AC.
Analog multimeters are not very accurate compared to their digital counterparts because they consist of several mechanical parts like springs and screws, which wear and tear over time. A digital multimeter is accurate, easy to work with, and therefore widely used.
Methods of current measurement
Once the circuit is operating and the multimeter range has been set, it is important to choose the method with which the measurement has to be taken. There are two methods of measurement of current using a multimeter.
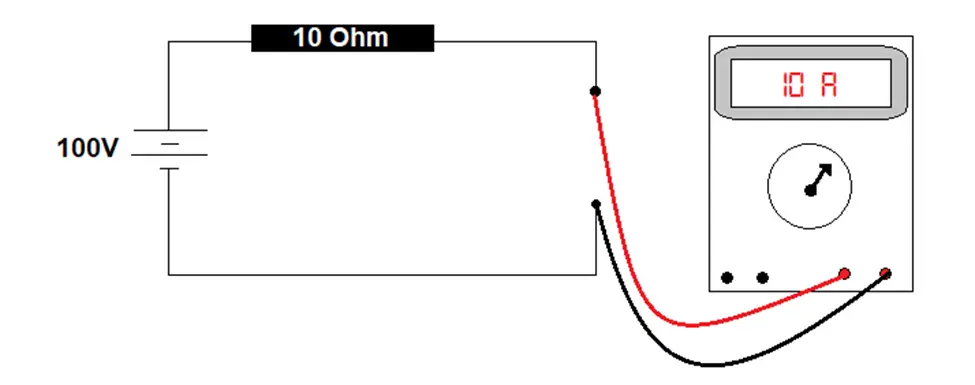
Series measurement or in-line measurement:
This is the most common technique of measuring current in a circuit using a multimeter or an ammeter. The multimeter probes are connected in series with the circuit and measure the series current through the circuit. This method of current measurement helps in knowing the current flowing through the circuit from the source at a constant voltage. By knowing the current through the circuit, we can divide it by the source voltage to obtain the load resistance or load impedance value as per Ohm’s law of resistance (R=V / I).
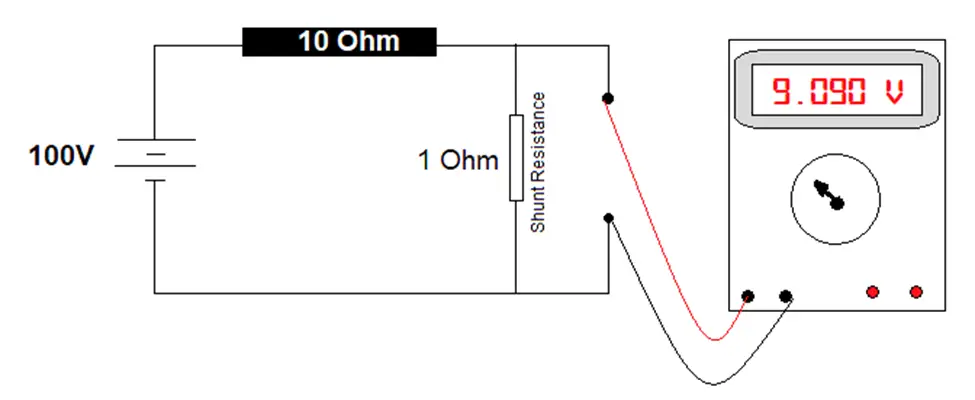
Parallel measurement or shunt measurement:
This method involves connecting a shunt resistor in parallel to the existing circuit. The voltage drop across the shunt resistor is measured using the multimeter. The obtained value of the voltage is divided by the shunt resistor value to get the current flowing through the resistor by applying Ohm’s law (R=V / I).
How to measure Current with an analog multimeter
Follow the following steps to measure the current.
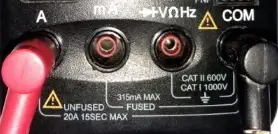
- Insert the probes into the correct socket of the multimeter marked for current as “A.” Do not insert the probe into the voltage socket because it causes a short circuit and an electrocution hazard. Also, ensure the probe is inserted in the correct range; the multimeter has ranges like 50mA, 100 mA, 1 A, etc.
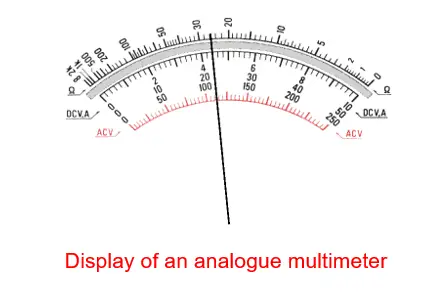
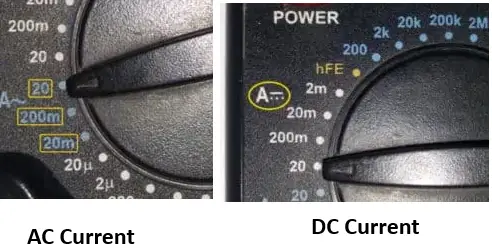
- Set the selector switch to the AC or DC ampere mode and ensure that you select the maximum range of current. Ensure if you measure AC current, the selection should be on AC, and if you measure DC current, the selection should be on DC. During the measurement of current, if you observe less deflection of the pointer, you may decrease the range. This type of precaution prevents meter overloading and eliminates the possibility of meter damage.
- Now, optimize the range for an accurate reading. Always adjust the range in such a way as to get maximum deflection of the meter. Thus, you can get the accurate measurement.
- After completion of the measurement, disconnect the probes from the meter and connect them to the voltage measurement socket.
Caution: Never measure the current when the probes connected to the voltage measurement socket of the meter.
How to measure current with a digital multimeter
Follow the following steps to measure current with a digital multimeter.
- Power on the meter
- Insert the black probe into the common socket of the meter and the red probe into the socket marked “A.” The digital multimeter may have two or more sockets for measuring current in different ranges from mA to 10 A.
- Select the highest current range in the multimeter and measure the current.
- If the display shows less, like if you select the 10 A range and the actual current is 0.5 A, then reduce the range to get the exact measurement reading.
- After completion of the measurement, disconnect the probes from the meter and connect them to the voltage measurement socket.
Caution: Never measure the current when the probes connected to the voltage measurement socket of the meter.
Important points to remember while using a multimeter
- Set the meter to a greater range than expected: Normally, a mathematical calculation can give the value of the current passing through the circuit. However, it is always recommended that the operator sets a higher range than expected so that the multimeter doesn’t burn out and cause any harm to the person operating it. The range can later be corrected accordingly if required.
- Check continuity or zero value: Before taking any measurement, one should conduct the continuity test by setting the meter to continuity mode and touching the probes together. Alternatively, both probes can be touched together to check whether the reading on the screen is zero or not. If it is zero, the multimeter can be safely used for measurement.
- Disconnect before changing modes or ranges: Sometimes, we need to check the voltage across a certain component if required. Therefore, the modes and the appropriate range are required to be selected. This shouldn’t be done with the probes connected to the circuit. It should be properly disconnected before making any required changes to avoid untoward incidents.
- Avoid leaving the multimeter set to a current range when not in use: Measurement of current through a multimeter is done in series with the circuit. Any current range within the multimeter has a low resistance path to avoid unwanted voltage drops across it, which can affect the actual reading. Thus, leaving a multimeter set to the current range can lead to an accident if its probes are connected in parallel to a power source because this will lead to a fatal short circuit.
- Avoid loose connections: Loose connections, whether with the multimeter or with the component on the circuit board, must be avoided, especially in high-voltage applications. A loose connection may lead to sparking, which can damage the sensitive components on the circuit. It also poses a risk to the operator.
- Be aware of potential risks: Always be sure about what you are trying to do. If you aren’t sure, it’s better to seek guidance from an experienced person. Alternatively, you can use various circuit simulation software to ease your work by reducing real-world risks.
With these things in mind, you can measure current across a circuit in a safe and sound manner. These apply to both analog and digital multimeters. However, digital multimeters are more commonly used now owing to their speed, accuracy, and range.