Testing a thermocouple with a multimeter is crucial in ensuring its proper functioning in temperature measurement. A thermocouple is a widely used instrument in this field, serving control and indication purposes.
The thermocouple is a crucial safety device widely employed in various industries. It utilizes the heat source to produce a milli-voltage for indication or control purposes in process industries, ovens, etc.
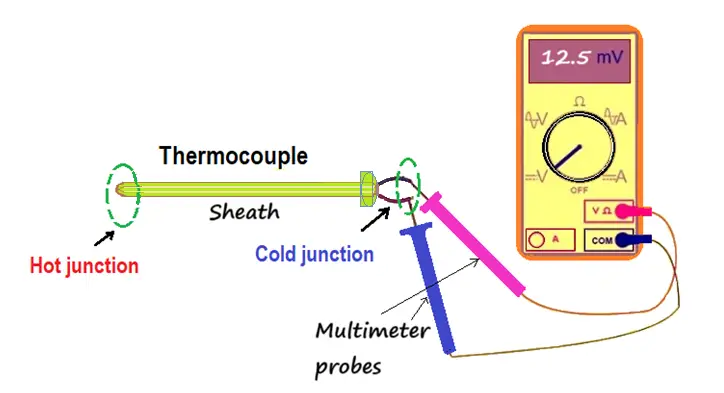
As shown in the above figure, the wiring is correct according to the digital display wiring diagram. If the multimeter displays a negative value, it indicates an incorrect connection of the thermocouple to the ‘+’ and ‘-ve’ terminals, necessitating replacement.
How does a thermocouple work?
Thermocouples are based on the Seebeck effect. It says that when a pair of dissimilar metals in contact with each end is subjected to temperature changes, they create a small voltage potential. The phenomenon was put forward by German physicist Thomas Johann Seebeck in 1821.
How to choose a type of thermocouple?
Thermocouples are known for their ability to measure temperatures over a wide range, from very low (cryogenic) to high temperatures. They are generally considered robust and resistant to vibrations and mechanical stress; thermocouples are often used for measurements in the process industry and laboratories. Their speed of response is high and can withstand corrosive atmospheres.
While selecting a thermocouple, the following points are taken into consideration.
- Temperature range
- The chemical resistance of the sheath material
- Resistant to abrasion and vibration
- Installation requirements
- Response time
- Cost
- Compatibility
Tools requirement
- Multimeter
- Crocodile lead clips
- Screwdriver
- Heat source
Thermocouple Testing Using a Multimeter
Make sure all safety protocols are followed before testing with a multimeter. Remove the thermocouple from the thermo well. Before testing with a multimeter, we first observe with the naked eye whether the protective sheath is in a good state or check for any damages.
Here is a step-by-step guide on how to test a thermocouple with the help of a multimeter. Ensure that our multimeter can read both ohms/resistance and millivolts (mV).
There are three main tests chosen to evaluate the healthiness of a thermocouple. The tests used are the
- Continuity test
- Open circuit test
- Direct measurement
Continuity Test
This test checks for the thermocouple’s integrity by ensuring a continuous electrical path from one end to the other. Select the ohms or resistance option on the multimeter. Connect the multimeter leads with proper polarity.
If the thermocouple has continuity, a low ohms reading should be visible on the multimeter. Many modern multimeters have a continuity test feature that includes an audible alert. This feature helps to check quickly if there is a break in the continuity of a wire.
If the reading on the multimeter display indicates an ‘OL’ reading, the thermocouple does not have continuity or ohmic resistance. The ‘OL’ indicates overload or reading beyond measurement. There are a few reasons for the ‘OL’ (overload) indication, including thermocouples.
Open Circuit Test
The open circuit test of a thermocouple typically involves measuring the open circuit voltage generated by the thermocouple when its two junctions are not connected to anything (i.e., when the circuit is open). This test is often done to verify the integrity and accuracy of the thermocouple.
For this, measure the milli voltage across the thermocouple terminals using a multimeter, which generates relatively small voltages. If the voltage is zero, it confirms an open circuit.
Thermocouples, for example, J-Type or K-type, produce different milli volts at various temperatures. By exposing the thermocouple to a heat source, a rise of millivolts can be checked. It confirms the healthiness of the thermocouple. The thermocouple produces a voltage output in the mV range that can be correlated to the temperature measured by the thermocouple.
Direct Measurement Test
A multimeter is an electrical measuring instrument that combines several functions in a single unit. They can measure voltage, current, resistance, and temperature. Please note that not all multimeters have the ability to measure temperature.
The models that do this are usually digital multimeters. They are known as DMM (Digital Multi-Meters). For example, Fluke is a well-known manufacturer of multimeters and other electronic testing equipment. These devices come with a specific function to measure temperature.
To measure temperatures with a multimeter, follow these steps.
- Make sure the multimeter is turned off before starting.
- Connect, for example, the type K temperature probe to the multimeter. Generally, the negative (common) connector connects to the COM port, and the positive connector (temperature probe) connects to the port marked with a T or temperature symbol.
- Turn the multimeter and select the temperature measurement function. This feature is usually represented by a thermometer symbol or the letter “T.”
- Place the tip of the temperature probe in direct contact with the object for which we want to measure the temperature. Ensure the connection is as tight as possible to get an accurate reading. Wait for a few seconds to allow the temperature reading to stabilize.