In this article, we will discuss the gas detector calibration procedure. The gas detectors are available in all plants for safety purposes. Gas detectors detect the presence of the gas present in the area it is installed. The presence of the gas can be due to any leakages. Gas detectors show the amount of gas that is present in the area where it is installed.
Various types of gas detectors are available in industries. Some of the types of gas detectors based on the type of gas they detect are:
- Chlorine (Cl2) gas detector
- Hydrogen (H2) gas detector
- Hydrocarbon (HC) gas detector
- Hydrogen Sulphide (H2S) gas detector
- Carbon Monoxide (CO) gas detector
Calibrating gas detectors is a bit difficult and a risky task too. It is risky because we need actual gases for calibrating the gas detectors. Although the concentrations of these gases are very low still it is advisable to handle them with utmost care.
The calibration frequency of gas detectors is more frequent compared to other analyzers and field instruments. PM frequency of gas detectors is usually 4 months or 6 months.
Let us discuss the calibration procedure of these gas detectors.
Follow the below procedure to do calibration of a gas detector.
Step-1
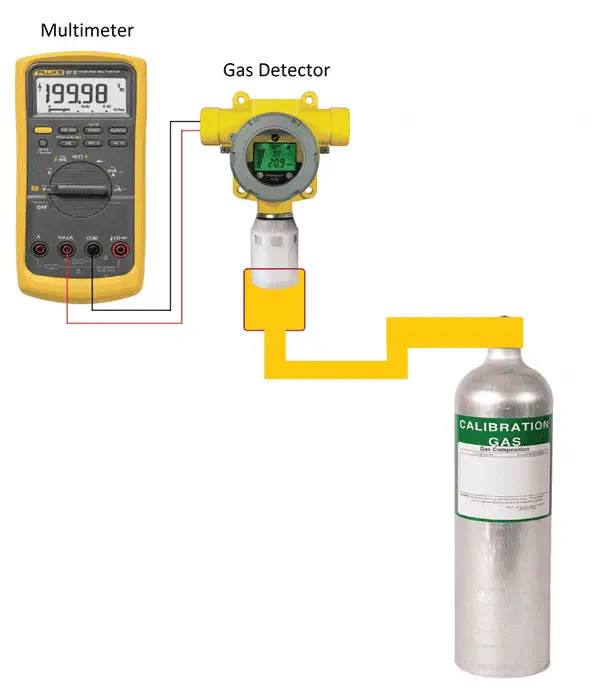
Connect a multimeter to the gas detector as shown in the figure to measure the mA output of the gas detector.
Step-2
Clean the gas detector’s sensor with clean air. Use instrument air if available. Because sometimes plant air has a moisture content. This moisture can cause damage to the gas detector’s sensor.
Step-3
Keep the gas detector in the atmosphere having clean air. It should show zero reading. If the reading is not zero, then zero calibration. After doing zero calibration, observe the response of the gas detector. The values should be steady. Also, see the mA output on the multimeter. The mA should also be steady.
Step-4
Now connect the gas cylinder of appropriate gas for calibration of the gas detector. Here cylinder is used to verify the span value of the gas. Verify the range of the gas detector and the value of ppm of the gas cylinder also. If the gas cylinder has a high concentration of gas, then the gas detector’s life will reduce drastically. This is because the gas detectors generally have an electrochemical sensor. The more gas it senses, the more electrochemical is utilized. This reduces the life of the gas detector’s sensor. Also, the gas cylinder should have a proper gas without an expiry date.
Step-5
Now set the flow through the calibration gas cylinder. A flow regulator is used to regulate the flow of the gas. While applying the gas through the gas detector stand in the upwind direction. Standing in the upwind direction will give protection against the gas leakages while doing the calibration job.
Step-6
After applying the gas with desired flow, wait for a few seconds for the gas detector’s response. After a few seconds, the gas detector will start showing the gas concentration which is fed through the gas cylinder. If there is a difference between the gas detector’s output and the gas-fed, then do span calibration.
Step-7
During the span calibration, the gas which we are feeding through the gas cylinder should be constantly fed to the gas detector. If any disruption in gas supply is there, then do span calibration again. After span calibration, keep feeding the span gas to the gas detector for a few seconds more. Check the stability of the gas detector. Also, keep on verifying the mA output also.
Step-8
After span calibration, again verify the zero reading in the atmosphere. If zero is disturbed, then again repeat steps from step number 3.
Step-9
After performing all steps, remove the multimeter and gas cylinder. Restore the gas detector.