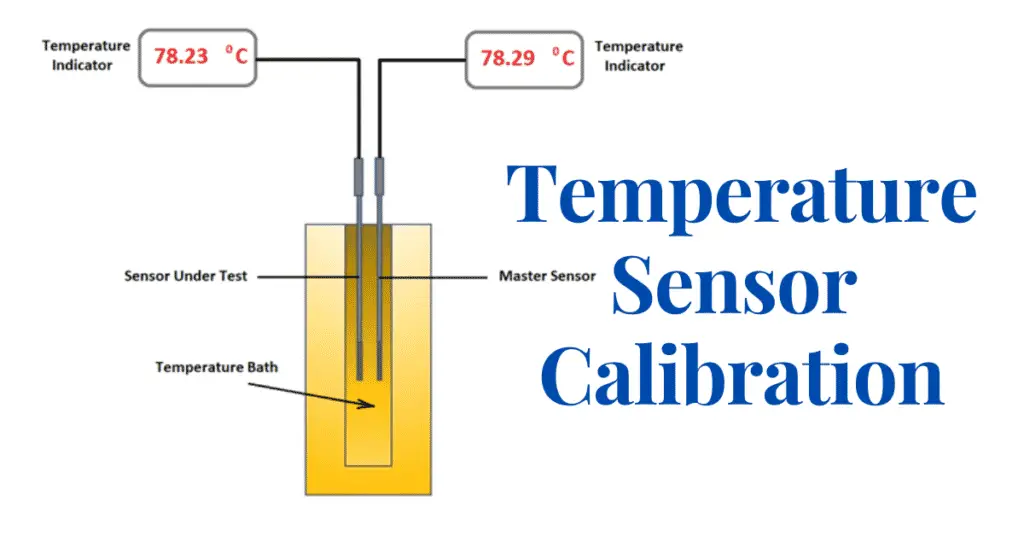
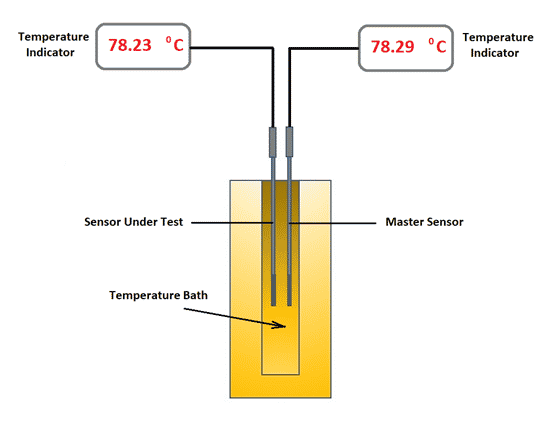
In this article, we will discuss the calibration of a temperature sensor with an indicator on a temperature bath which is a master calibration instrument.
Mainly there are two types of temperature sensors used in the field for measuring the temperature of any process. They both are RTD and thermocouple. Other sensors like thermistors and pyrometers and Infrared thermometers are also there. But most widely used temperature sensors are RTD and thermocouple.
We will see how to do calibration of RTD and thermocouple. For doing this calibration job, the following equipment is required.
- Temperature Bath of an appropriate range
- Temperature Sensor to be calibrated
- Master temperature sensor or a calibrated temperature sensor
- Temperature indicators
- A multimeter or a multifunction calibrator
Now, we will discuss the procedure of calibration of the temperature sensors in detail.
We need to follow the below-mentioned steps for the calibration of a temperature sensor.
Step-1
Insert the temperature sensor to be tested in the temperature bath. The best practice is to note down the insertion length of the temperature sensor in the temperature bath.
Step-2
Connect a temperature indicator to the temperature sensor. You can use a multimeter also to note down the resistance (in case of RTD) or millivolt (in case of thermocouple)and then calculate the temperature in case you don’t have a temperature indicator. we can also use a multifunction calibrator.
Step-3
Insert a master temperature sensor in the temperature bath. Here the important thing to be taken care of is the insertion length. The insertion length of the master sensor should be the same as that of the sensor under test. Different insertion lengths of both sensors can result in inaccurate readings. Different insertion lengths for both sensors can create problems in doing the calibration. We need a master temperature sensor because the temperature bath doesn’t produce accurate temperatures every time. So for cross verification of the generated temperature, we use a master temperature sensor.
Step-4
Connect a temperature indicator to the master sensor. Here also, you can use a multimeter to note down the resistance (in case of RTD) or millivolt (in case of thermocouple) in case you don’t have a temperature indicator. You can then calculate the temperature corresponding to the resistance or millivolt.
Step-5
You need the range of the sensor. A datasheet can show you the range of the sensor. From range, you know the 0% value and 100% value. Calculate 25% value, 50% value and 75% value from it. Suppose range is from -2000 C to 2000 C, then -2000 C is 0% value and 2000 C is 100% value. -1000 C is 25% value, 00 C is 50% value and 1000 C is 75% value.
Step-6
Apply 0% value from the temperature bath and wait until the temperature bath attains the set temperature. Now note down the readings from both the sensor. Take 5 readings at the interval of 30 seconds to 40 seconds. If there is no major deviation, then take the average of all values you get at 0% value.
Step-7
Similarly check and note down the values for 25% value, 50% value, 75% value and 100% value. Now check for 75% value, 50% value 25% value and 0% value. Remember to wait for a few minutes for the temperature to get stable in the temperature bath. It is good practice to plot a graph of upward readings and downward readings. This helps to know the hysteresis of the temperature sensor we are using.
Step-8
Now calculate the error% from the noted values. If an error is within the limits (this depends on your process criticality and rules of the company) then the sensor is ok. If the error is more than the defined limit then the sensor is NOT OK for use. You should discard it and replace it with a new one.
Step-9
Remove both the sensors and the temperature indicators. Handle both the temperature sensors with care because they might be hot or cold depending on the last temperature given from the temperature bath.
Step-10
Set the room temperature in the temperature bath. Turn off the temperature bath after it attains room temperature. Because turning the temperature bath at other set points can cause damage to the temperature bath in terms of inaccuracy, instability, and non-linearity.